Windows 10 ARM64平臺UWP串口程序
Windows 10 IoT ARM64平臺支持最新的UWP框架,本文將介紹如何開發(fā)一個UWP基礎串口程序。
1、創(chuàng)建UWP工程
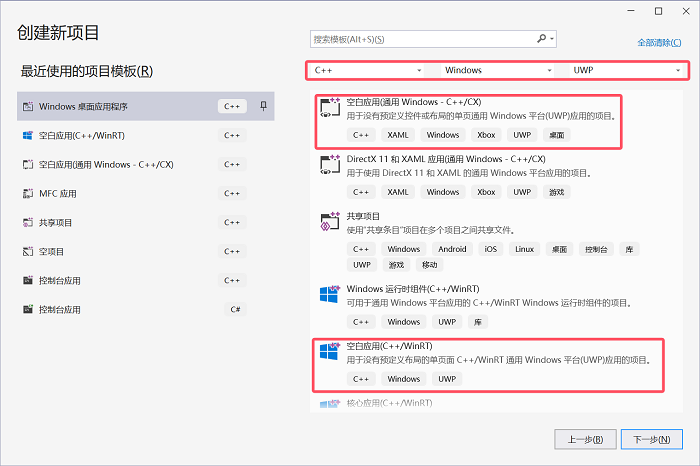
1. 打開visual studio 2022,點擊“創(chuàng)建新項目”。
2. 選擇篩選條件,語言C++或C#或VB(它們框架結構一樣,庫名及使用方法一樣,只是不同語言寫法不一樣,本文以C++為例)。平臺選擇Windows,應用類型選擇UWP。
3. 選擇“空白應用”,其中后面括號標注(C++/CX)表示C++ 14規(guī)范,括號標注(C++/WinRT)表示C++ 17規(guī)范,它們語法特性有所不同,用戶可選擇自己更熟悉的標準創(chuàng)建項目(本文以C++/CX為例)。

2、UWP界面設計
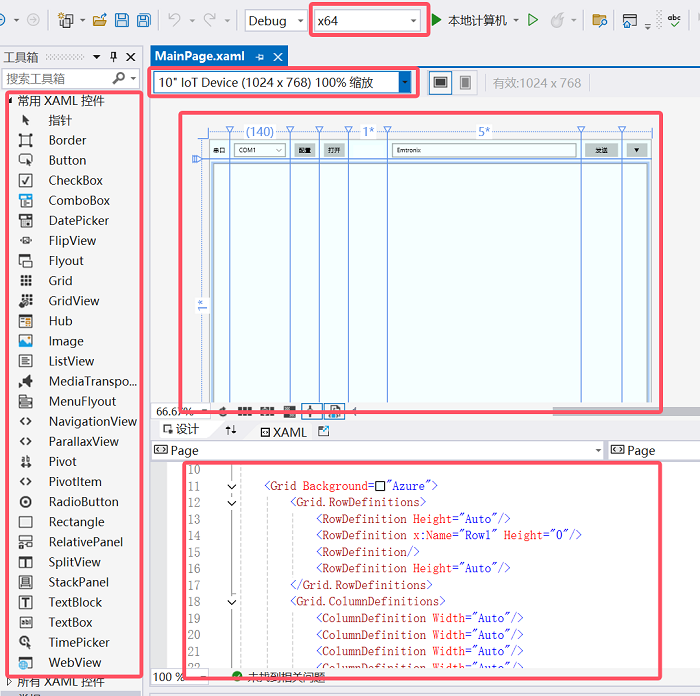
1. 創(chuàng)建工程后,雙擊解決方案資源管理器中MainPage.xaml文件進入界面編輯,先選擇平臺為X64,選擇好工程所適應的屏幕大小。

2. UWP通過XAML語言進行界面設計,可以直接拖動控件到設計窗口中,再編輯控件的屬性,即可在XAML代碼頁里看到自動生成的界面代碼。也可以直接在XAML代碼頁中編輯。
3. 這里我們在Grid中創(chuàng)建4*8的表格,然后將控件放入相應的表格單元中,使得控件更加整齊,也便于窗口大小變化時控制自動對齊,更美觀。
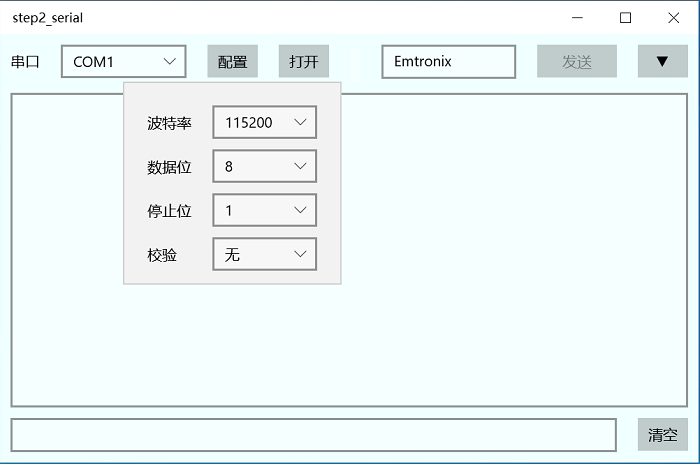
4. 設置好各個控件的控件名稱,Margin,及事件綁定函數(shù)等。彈出子窗口可以用Flyout實現(xiàn)。
<Grid Background="Azure">
    <Grid.RowDefinitions>
        <RowDefinition Height="Auto"/>
        <RowDefinition x:Name="Row1" Height="0"/>
        <RowDefinition/>
        <RowDefinition Height="Auto"/>
    </Grid.RowDefinitions>
    <Grid.ColumnDefinitions>
        <ColumnDefinition Width="Auto"/>
        <ColumnDefinition Width="Auto"/>
        <ColumnDefinition Width="Auto"/>
        <ColumnDefinition Width="Auto"/>
        <ColumnDefinition Width="*"/>
        <ColumnDefinition Width="5*"/>
        <ColumnDefinition Width="Auto"/>
        <ColumnDefinition Width="Auto"/>
    </Grid.ColumnDefinitions>

    <TextBlock Text="串口" Margin="10,16,10,0" VerticalAlignment="Top"/>
    <ComboBox x:Name="ComboPort" Grid.Column="1"  Margin="10,10,10,0" VerticalAlignment="Top" SelectedIndex="0" Width="120">
        <ComboBoxItem Content="COM1"/>
        <ComboBoxItem Content="COM2"/>
        <ComboBoxItem Content="COM3"/>
    </ComboBox>
    <Button x:Name="BtnCfg" Content="配置" Grid.Column="2"  Margin="10,10,10,0" HorizontalAlignment="Stretch" VerticalAlignment="Top">
        <Button.Flyout>
            <Flyout>
                <Grid>
                    <Grid.RowDefinitions>
                        <RowDefinition Height="Auto"/>
                        <RowDefinition Height="Auto"/>
                        <RowDefinition Height="Auto"/>
                        <RowDefinition/>
                    </Grid.RowDefinitions>
                    <Grid.ColumnDefinitions>
                        <ColumnDefinition Width="Auto"/>
                        <ColumnDefinition/>
                    </Grid.ColumnDefinitions>
                    <TextBlock Text="波特率" Margin="10,10,10,0" VerticalAlignment="Center"/>
                    <ComboBox x:Name="ComboBaud" Grid.Column="1"  Margin="10,10,10,0" VerticalAlignment="Stretch" SelectedIndex="5" Width="100">
                        <ComboBoxItem Content="4800"/>
                        <ComboBoxItem Content="9600"/>
                        <ComboBoxItem Content="19200"/>
                        <ComboBoxItem Content="38400"/>
                        <ComboBoxItem Content="57600"/>
                        <ComboBoxItem Content="115200"/>
                        <ComboBoxItem Content="230400"/>
                        <ComboBoxItem Content="460800"/>
                        <ComboBoxItem Content="921600"/>
                    </ComboBox>
                    <TextBlock Text="數(shù)據(jù)位" Grid.Row="1" Margin="10,10,10,0" VerticalAlignment="Center"/>
                    <ComboBox x:Name="ComboDataBit" Grid.Row="1" Grid.Column="1"  Margin="10,10,10,0" VerticalAlignment="Stretch" SelectedIndex="1" Width="100">
                        <ComboBoxItem Content="7"/>
                        <ComboBoxItem Content="8"/>
                    </ComboBox>
                    <TextBlock Text="停止位" Grid.Row="2" Margin="10,10,10,0" VerticalAlignment="Center"/>
                    <ComboBox x:Name="ComboStopBit" Grid.Row="2" Grid.Column="1"  Margin="10,10,10,0" VerticalAlignment="Stretch" SelectedIndex="0" Width="100">
                        <ComboBoxItem Content="1"/>
                        <ComboBoxItem Content="1.5"/>
                        <ComboBoxItem Content="2"/>
                    </ComboBox>
                    <TextBlock Text="校驗" Grid.Row="3" Margin="10,10,10,0" VerticalAlignment="Center"/>
                    <ComboBox x:Name="ComboParity" Grid.Row="3" Grid.Column="1"  Margin="10,10,10,0" VerticalAlignment="Stretch" SelectedIndex="0" Width="100">
                        <ComboBoxItem Content="無"/>
                        <ComboBoxItem Content="奇"/>
                        <ComboBoxItem Content="偶"/>
                    </ComboBox>
                </Grid>
            </Flyout>
        </Button.Flyout>
    </Button>
    <Button x:Name="BtnOpen" Content="打開" Grid.Column="3"  Margin="10,10,10,0" HorizontalAlignment="Stretch" VerticalAlignment="Top" Click="BtnOpen_Click"/>
    <TextBox x:Name="TBoxInfo" Grid.Column="4" Margin="10,14,10,0" BorderThickness="0" HorizontalAlignment="Stretch" VerticalAlignment="Top" IsReadOnly="True" Foreground="Red"/>
    <TextBox x:Name="TBoxSend" Grid.Column="5"  Margin="10,10,10,0" HorizontalAlignment="Stretch" VerticalAlignment="Top" Text="Emtronix" TextWrapping="Wrap" AcceptsReturn="True"/>
    <Button x:Name="BtnSend" Content="發(fā)送" Grid.Column="6"  Margin="10,10,10,0" HorizontalAlignment="Stretch" Click="BtnSend_Click" VerticalAlignment="Top"/>
    <Button x:Name="BtnMore" Content="▼" Width="48" Grid.Column="7"  Margin="10,10,10,0" HorizontalAlignment="Right" VerticalAlignment="Top" Click="BtnMore_Click"/>
    <TextBlock Text="間隔" Grid.Row="1" Grid.Column="5" Margin="10,10,120,0" VerticalAlignment="Center" HorizontalAlignment="Right"/>
    <ComboBox x:Name="ComboTimer" Grid.Row="1" Grid.Column="5"  Margin="10,10,10,0" Width="100" SelectedIndex="0" VerticalAlignment="Top" HorizontalAlignment="Right">
        <ComboBoxItem Content="10ms"/>
        <ComboBoxItem Content="20ms"/>
        <ComboBoxItem Content="50ms"/>
        <ComboBoxItem Content="100ms"/>
        <ComboBoxItem Content="200ms"/>
        <ComboBoxItem Content="500ms"/>
        <ComboBoxItem Content="1s"/>
        <ComboBoxItem Content="2s"/>
    </ComboBox>

    <Button x:Name="BtnAuto" Content="自動發(fā)送" Grid.Row="1" Grid.Column="6"  Margin="10,10,10,0" HorizontalAlignment="Stretch" VerticalAlignment="Top" Click="BtnAuto_Click"/>
    <TextBox x:Name="TBoxRecv" Grid.Row="2" Grid.ColumnSpan="8"  Margin="10" HorizontalAlignment="Stretch" TextWrapping="Wrap" IsReadOnly="True" ScrollViewer.VerticalScrollMode="Auto"/>
    <TextBox x:Name="TBoxState" Grid.Row="3" Grid.ColumnSpan="7"  Margin="10,0,10,10" HorizontalAlignment="Stretch" IsReadOnly="True"/>
    <Button x:Name="BtnClean" Content="清空" Grid.Row="3" Grid.Column="8"  Margin="10,0,10,10" HorizontalAlignment="Stretch" VerticalAlignment="Top" Click="BtnClean_Click"/>

</Grid>
3、串口代碼設計
用記事本打開工程Package.appxmanifest,在Capabilities里添加如下內容
<Capabilities>
    <Capability Name="internetClient" />
        <DeviceCapability Name="serialcommunication">
        <Device Id="any">
            <Function Type="name:serialPort" />
         </Device>
    </DeviceCapability>
</Capabilities>
3.1 查詢串口
已知串口名,可以直接通過CreateFile打開串口。否則需要查詢設備中的串口。
除了可以用API函數(shù)CM_Get_Device_Interface_List查詢,微軟專門封裝了一個硬件庫Devices,可以更簡便地訪問設備接口。
通過任務方式create_task查詢接口,可以避免主界面卡頓,使用任務比使用線程更簡便些。
通過創(chuàng)建cancellationToken,可以根據(jù)需求隨時中斷任務。
使用then可以鏈式執(zhí)行任務,相比使用函數(shù),代碼邏輯可讀性更高些。
Platform::Collections::Vector<Platform::Object^>^ _serialDevice;
MainPage::MainPage()
{
       InitializeComponent();
       //…
       _serialDevice = ref new Platform::Collections::Vector<Platform::Object^>();
       ListAllPorts();
}

void MainPage::ListAllPorts(void)
{
       cancellationTokenSource = new Concurrency::cancellation_token_source();

Concurrency::create_task(FindAllAsyncSerialAsync()).then([this](Windows::Devices::Enumeration::DeviceInformationCollection^ devices)
       {
              _serialDevice->Clear();
              Windows::Devices::Enumeration::DeviceInformation^ deviceInfo;
              for (auto&& deviceInfo : devices)
              {
                     _serialDevice->Append(ref new Device(deviceInfo->Id, deviceInfo));
              }
       });
}

Windows::Foundation::IAsyncOperation<Windows::Devices::Enumeration::DeviceInformationCollection^>^ MainPage::FindAllAsyncSerialAsync(void)
{
       String^ aqs = Windows::Devices::SerialCommunication::SerialDevice::GetDeviceSelector();
       return Windows::Devices::Enumeration::DeviceInformation::FindAllAsync(aqs);
}
3.2 打開串口
使用Devices庫的串口方法異步打開串口,設置串口各個參數(shù)。
void MainPage::OpenPort()
{
       int index = ComboPort->SelectedIndex;

       Device^ device = static_cast<Device^>(_serialDevice->GetAt(index));
       Windows::Devices::Enumeration::DeviceInformation^ entry = device->DeviceInfo;

       concurrency::create_task(OpenPortAsync(entry, cancellationTokenSource->get_token()));
       return;
}

Concurrency::task<void> MainPage::OpenPortAsync(Windows::Devices::Enumeration::DeviceInformation^ device, Concurrency::cancellation_token cancellationToken)
{
       auto childTokenSource = Concurrency::cancellation_token_source::create_linked_source(cancellationToken);
       auto childToken = childTokenSource.get_token();
       return Concurrency::create_task(Windows::Devices::SerialCommunication::SerialDevice::FromIdAsync(device->Id), childToken)
              .then([this](Windows::Devices::SerialCommunication::SerialDevice^ serial_device)
       {
              try
              {
                     _serialPort = serial_device;

                     Windows::Foundation::TimeSpan _timeOut;
                     _timeOut.Duration = 100L;

                     // Configure serial settings
                     _serialPort->WriteTimeout = _timeOut;
                     _serialPort->ReadTimeout = _timeOut;


                     serialPort->DataBits = 115200;
                     _serialPort->DataBits = 7;
                     _serialPort->StopBits = Windows::Devices::SerialCommunication::SerialStopBitCount::One;
                     _serialPort->Parity = Windows::Devices::SerialCommunication::SerialParity::None;

                     _serialPort->Handshake = Windows::Devices::SerialCommunication::SerialHandshake::None;

                     _dataReaderObject = ref new Windows::Storage::Streams::DataReader(_serialPort->InputStream);
                     _dataReaderObject->InputStreamOptions = Windows::Storage::Streams::InputStreamOptions::Partial;
                     _dataWriterObject = ref new Windows::Storage::Streams::DataWriter(_serialPort->OutputStream);


                     Listen();
              }
              catch (Platform::Exception^ ex)
              {
              }
       });
}
綁定串口輸入輸出流到自定的Object中,以便后面任務通過Object讀寫串口。
開啟任務讀串口信息。
3.3 讀串口
創(chuàng)建listen函數(shù)用于串口數(shù)據(jù)讀取。
Listen函數(shù)中創(chuàng)建讀取串口任務。使用任務或線程都可以實現(xiàn)代碼的并發(fā)運行,具體使用任務還是使用線程,用戶可以根據(jù)應用實際情況選擇,一般來說任務相對簡潔,適合短操作,線程更適合長時運行的操作。本文采用任務模式實現(xiàn)串口數(shù)據(jù)監(jiān)聽,讀取。
void MainPage::Listen()
{
       try
       {
              if (_serialPort != nullptr)
              {
                     concurrency::create_task(ReadAsync(cancellationTokenSource->get_token()));
              }
       }
       catch (Platform::Exception^ ex)
       {
              if (ex->GetType()->FullName == "TaskCanceledException")
              {
                     ClosePort();
              }
       }
}
讀取成功后,繼續(xù)listen監(jiān)聽下一段串口信息。
Concurrency::task<void> MainPage::ReadAsync(Concurrency::cancellation_token cancellationToken)
{
       unsigned int _readBufferLength = 1024;

       auto childTokenSource = Concurrency::cancellation_token_source::create_linked_source(cancellationToken);
       auto childToken = childTokenSource.get_token();
       return concurrency::create_task(_dataReaderObject->LoadAsync(_readBufferLength), childToken).then([this](unsigned int bytesRead)
       {
              if (bytesRead > 0)
              {
                     m_Rx += bytesRead;
                     TBoxRecv->Text += _dataReaderObject->ReadString(bytesRead);
                     ShowState();
              }
              Listen();
       });
}
如果串口關閉,通過Token立刻關閉可能正在執(zhí)行中的讀取任務。
void MainPage::CancelReadTask(void)
{
       cancellationTokenSource->cancel();
}
3.4 寫串口
當點擊發(fā)送按鈕時,創(chuàng)建任務進行串口寫數(shù)據(jù)
void step2_serial::MainPage::BtnSend_Click(Platform::Object^ sender, Windows::UI::Xaml::RoutedEventArgs^ e)
{
       if (_serialPort != nullptr)
       {
              try
              {
                     WriteAsync(cancellationTokenSource->get_token());
              }
              catch (Platform::Exception^ ex)
              {
              }
       }
}

Concurrency::task<void> MainPage::WriteAsync(Concurrency::cancellation_token cancellationToken)
{
       _dataWriterObject->WriteString(TBoxSend->Text);
       auto childTokenSource = Concurrency::cancellation_token_source::create_linked_source(cancellationToken);
       auto childToken = childTokenSource.get_token();
       return concurrency::create_task(_dataWriterObject->StoreAsync(), childToken).then([this](unsigned int bytesWritten)
       {
              if (bytesWritten > 0)
              {
                     m_Tx += bytesWritten;
              }
       });
}
如果串口關閉,通過Token立刻關閉可能正在執(zhí)行中的寫任務。
3.5 串口關閉
當點擊關閉按鈕,或其它原因中斷串口讀寫時
void MainPage::ClosePort()
{
       delete(_dataReaderObject);
       _dataReaderObject = nullptr;

       delete(_dataWriterObject);
       _dataWriterObject = nullptr;

       delete(_serialPort);
       _serialPort = nullptr;

       return;
}
通過Token通知立刻關閉任務,關閉打開的串口讀寫Object
CancelReadTask();
3.6 創(chuàng)建timer用于自動發(fā)送
可以添加一個自動發(fā)送功能方便測試,UWP中添加timer的方式如下。
Windows::UI::Xaml::DispatcherTimer^ m_Timer;
m_Timer = ref new Windows::UI::Xaml::DispatcherTimer();

TimeSpan ts;
ts.Duration = 20*10000;        //表示20ms
m_Timer->Interval = ts;
m_Timer->Tick += ref new EventHandler<Object^>(this, &MainPage::AutoTimer_Tick); //m_Timer->Start();

void step2_serial::MainPage::AutoTimer_Tick(Object^ sender, Object^ e)
{
       if (_serialPort != nullptr)
       {
              try
              {
                     if (TBoxSend->Text->Length() > 0)
                     {
                            WriteAsync(cancellationTokenSource->get_token());
                     }
              }
              catch (Platform::Exception^ ex)
              {
              }
       }
}
4、調試
打開Win10 IoT板子上的調試助手。

選擇工程平臺為ARM64,編譯運行,示例如下。

需要程序源碼可以聯(lián)系英創(chuàng)工程師獲得。